In the steampunk world, I am Lucretia Strange, the Baroness Strange. I run the Promethean Society, and do a variety of presentations at steampunk conventions.
In the real world, I am Cassie Beyer and a historian with a blog, History, Interrupted, devoted to history, steampunk, costuming, popular culture and other eclectic interests.
You can best reach me through the Promethean Society or through Cassie@AlterEgoDesign.net. AlterEgo is my freelance web design endeavor focused on small businesses, individuals and organizations.
Bustled Overskirt
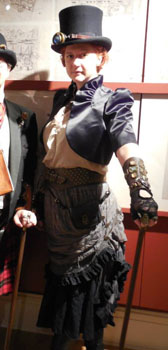
 This is the second overskirt I created, and it is much more complicated
than the first, as well as requiring a bit more patience.
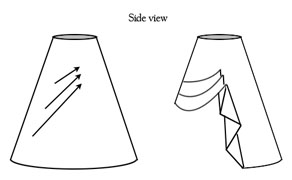
Work on the front first. Instead of grabbing two points near the hem, as I did in my first skirt, I grabbed two points much higher up. And instead of attaching them to my butt, I'm attaching them near the hip. I went through this process three times, each time grabbing further down, and each time bringing up toward the hip. Pin in place, then sew once you've tried it on. make sure your attachment points are low enough that they aren't getting squashed under your corset.
Decorative buttons were added to the sides afterward. They have no functional purpose.
I naturally ended up with a nice zig-zag pattern along the sides, but they flopped around a lot, so I helped them a bit with a few stitches holding them in shape.

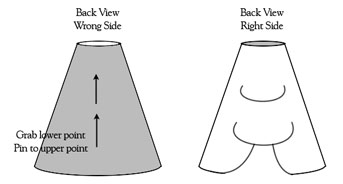
Now the back needs to be bustled up. Pick a point, grab it from the underside, pull it upward, and pin. This creates a smooth puff of cloth on the right side. Continue bustling as desired. I started by grabbing a center point and pulling it straight up, but I also grabbed points to the side and pulled them upward and toward the center for variety. (The below diagram only indicates pulling the material straight up.)
Don't sew anything until you are happy with the pinned result.

 In the example I'm wearing, I first added a dark ruffle to the bottom hem
of the skirt. if you're planning on adding that sort of embellishment, you
should do it before you start folding and bustling.
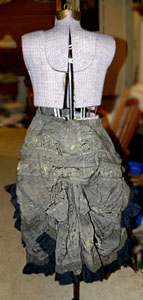
The image to the left shows the back of the finished skirt. There is a small bustle pad in the upper portion of the skirt.
This process of pinching a point, lifting it upward and pinning is the same one used in the creation of the Ball Gown Overskirt, which includes a photo of the wrong side of the garment to help illustrate the process.