In the steampunk world, I am Lucretia Strange, the Baroness Strange. I run the Promethean Society, and do a variety of presentations at steampunk conventions.
In the real world, I am Cassie Beyer and a historian with a blog, History, Interrupted, devoted to history, steampunk, costuming, popular culture and other eclectic interests.
You can best reach me through the Promethean Society or through Cassie@AlterEgoDesign.net. AlterEgo is my freelance web design endeavor focused on small businesses, individuals and organizations.
 From Shirt to Shrug
I really hate sewing sleeves and collars. They need patterns, and getting curved pieces to match up smoothly is a major pain.
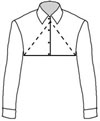
So I was more than a little intimidated by the idea of this shrug, which is pretty much nothing but sleeves and a collar.
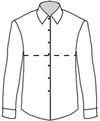
Then it occurred to me what I wanted was essentially a shirt with most of the body removed, and that's exactly how I should create one.
Recycling Rejected Clothing
I started with a Goodwill shirt made out of "polyester with polyethylene coating." This thing has never come within a mile of a natural fiber. The upside of that is it can't fray. But that's not very steampunk, is it? By material, not really, but by look, sure. In small quantities, it gives a leather-like impression. (As a shirt, it billowed far too much to appear leathery.)
As an Aside: Consider that someone had to design this and then some port of approval process agreed that this was a good idea.. Then, a minimum of one buyer agreed with this conclusion, although I wouldn't hazard a guess as to which decade this would have occurred. There is no reason for any sane person to have worn that shirt...ever.
I'd like to think of my costume collection as a closet for wayward and abused articles of clothing. They're given a good home and find new purpose in existence.
Building the Shrug
Step one: Go to a thrift store and get an appropriate shirt. Appropriate depends entirely on what kind of look you're wanting. If you're thinking leather, check out the coats. You can often get a leather coat at Goodwill for $10-$20 bucks. Do keep in mind that working with leather can be more difficult. You might not be able to hem it (although leather doesn't unravel, so it's not strictly necessary).
 Step two: Cut off the excess
material. You may want to start by leaving an overly generous amount of
material, trying it on, and then trimming to suit. You can never try something
on too often. Also, remember to leave enough material to hem, if you're going
to hem.
 Be careful not to compromise the sleeves. I
started about 2 inches below the bottom of where the sleeve joins the torso and
cut straight across, then diagonally cut out the front.
 Step three: Accessorize and modify
to taste. Some suggestions:
- Replace the buttons. Most shirts have boring, plastic buttons. There are plenty of better buttons out there. You can pick them up online or at any fabric store.
- Shorten the sleeves. You can either cut them off where you want them to end, or cut them but leave extra material you can roll up.
- Add epaulettes to the shoulders if you're looking for a more military look.
- Alter the collar, such as by trimming it down or standing it up.