In the steampunk world, I am Lucretia Strange, the Baroness Strange. I run the Promethean Society, and do a variety of presentations at steampunk conventions.
In the real world, I am Cassie Beyer and a historian with a blog, History, Interrupted, devoted to history, steampunk, costuming, popular culture and other eclectic interests.
You can best reach me through the Promethean Society or through Cassie@AlterEgoDesign.net. AlterEgo is my freelance web design endeavor focused on small businesses, individuals and organizations.
One Hour Skirt - From Curtain to Skirt
Paying a premium for a complex skirt is one thing, but even simple, long
steampunk skirts can easily run $50-$90, even though they don't require much
sewing. So, if you're willing to at least briefly pick up a sewing needle, you
can save yourself considerable money.
If you're completely unfamiliar with sewing, check out Sewing Basics.
In the Thrift Shopping section, I mention using second-hand curtains as cheap sewing material, and a great use for such material is the creation of a skirt. Here I transform a curtain into a skirt in about a hour.
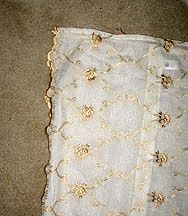 The
particular curtain I have has some distinct issues to address. The
particular curtain I have has some distinct issues to address.
First, it's got a great golden hem to it that I don't want to lose. Second, several inches from the hem on one side is a seam and a pocket of fabric used to attach the curtain to a curtain rod. While I can cut off the pocket (and the accompanying tag!), there's nothing I can do about the seam. Third, the fabric is fairly sheer. This is good in that I can bunch up a whole lot of it without it getting overly bulky. However, it clearly needs some sort of undergarment. |
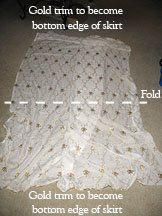 Step one - The gold hem that I want to keep is on
the top and bottom of this piece of cloth. Eventually, I want all of it
to be at the bottom. Luckily, the fabric is long enough for me to cut
in half, which will also add fullness. So the first thing we do is fold
the fabric in half, bringing the two gold hems together. Step one - The gold hem that I want to keep is on
the top and bottom of this piece of cloth. Eventually, I want all of it
to be at the bottom. Luckily, the fabric is long enough for me to cut
in half, which will also add fullness. So the first thing we do is fold
the fabric in half, bringing the two gold hems together.
(Obviously, you should flatten the fabric before folding. I had limited space in which to take pictures.) To get from this photo to the next, imagine folding the fabric from the top down, so that both gold hems are at the bottom. Then rotate 90 degrees clockwise, so that the gold hems are on the left and the fold is now on the right. |
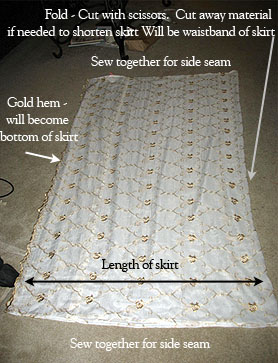 Step two - Once the fabric
is folded, cut along the fold. The measurement between the cut (on the
right) and the gold hem (on the left) will be the length of the skirt.
If you want the skirt to be shorter, you'll want to cut off an
appropriate amount from the right. Step two - Once the fabric
is folded, cut along the fold. The measurement between the cut (on the
right) and the gold hem (on the left) will be the length of the skirt.
If you want the skirt to be shorter, you'll want to cut off an
appropriate amount from the right.
Step three - We now want to hem the two side seams, which are at the top and bottom of this picture. Make sure the right-sides of the fabric are facing each other. That way your seams will be on the wrong side, which will eventually be the inside of the garment. Step four - Hem the right edge of the fabric, which is the edge you originally cut. To save time and effort, sew your drawstring into the hem. |
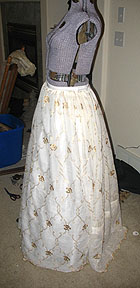 Step five - Turn the garment right-side out, so the
seams you've sewn end up on the inside of the garment. Step five - Turn the garment right-side out, so the
seams you've sewn end up on the inside of the garment.
The skirt is displayed here with my bridal crinoline. That solves the opacity problem, and it gives the skirt some nice volume. I'll probably also tuck my wire bustle pad under it when I actually wear it. Note how much bunching is going on around the waist. We just took about 10 feet of fabric and drew it up around a 30(ish) inch waist. Because the material is so sheer, it works. With heavier fabrics, you may need a slightly more complex pattern that cuts away some of the fabric at top, such as a circle skirt. I've also smoothed the skirt out in front, leaving most of the bunching toward the back, giving it more of a late Victorian bustled shape, rather than a Civil War era bell skirt shape. |
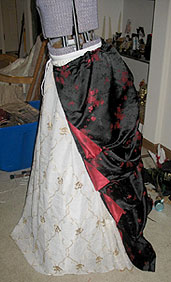 Remember that seam I noted at the beginning? I've made
sure that it ended up at the back of my skirt, where it's less
noticeable. (You can see it in the previous image.) To further disguise
it, I need an overskirt to place over this underskirt. Luckily, since
this skirt is white, it will match anything I pair with it. I've chosen
to use my longest and most formal overskirt here. Remember that seam I noted at the beginning? I've made
sure that it ended up at the back of my skirt, where it's less
noticeable. (You can see it in the previous image.) To further disguise
it, I need an overskirt to place over this underskirt. Luckily, since
this skirt is white, it will match anything I pair with it. I've chosen
to use my longest and most formal overskirt here.
The waistline looks rather unprofessional. After all, those skirts are being held up with drawstrings. However, whatever corset I wear with this will easily cover the waistline, which is why I happily cut corner on waistlines. |